Under PowerShell 4 supplied with Windows Server 2012 r2 and Windows 8.1 you can run a simple command to create a new certificate in seconds.
New-SelfSignedCertificate -DnsName hostname.domain.com -CertStoreLocation cert:\LocalMachine\My
In my case I created one for use in Exchange 2010 and it worked perfectly.
ICT
WSUS to Foreground Mode using PowerShell
Enable Foreground:$Configuration=(Get-WSUSServer).GetConfiguration()
$Configuration.BitsDownloadPriorityForeground=$true
$Configuration.Save()
Disable Foreground:$Configuration=(Get-WSUSServer).GetConfiguration()
$Configuration.BitsDownloadPriorityForeground=$false
$Configuration.Save()
Check Foreground State:(Get-WSUSServer).GetConfiguration().BitsDownloadPriorityForeground
Nginx quicker than Apache2 on Raspberry Pi 2
Yesterday I setup my Raspberry Pi with Apache2 in the same manner I would for any Linux web server. My first impression was that it was slow to load my WordPress homepage. Installing APC as per The Perfect APC Configuration – Greg Rickaby improved load times but I was still seeking fast page load times.
After reading posts like The Raspberry Pi Web Server Speed Test – Raspberry Pi Blog and Raspberry Pi web server – Comparing the performance of Nginx and Apache web servers I decided to install Nginx (pronounced engine-x). Being new to Nginx I used this Tutorial – Install Nginx and PHP on Raspbian – RaspiPress guide to do this inital configuration. I also used this guide to tweak Nginx for WordPress WordPress NGINX Rewrite Rules. First impressions of Nginx is that its fast and used far less memory.
Don’t forget to configure APC after installing Nginx as PHP caching does work to improve page load times.
Load testing and benchmarking is always a must when changing configurations on web servers. Look at apache – ab load testing – Stack Overflow and Load Testing and Benchmarking With Siege.
Can a Raspberry Pi 2 be a web server?
Over the past year I’ve been running a HP Proliant DL 38 G3 to host this website and other web apps. For the age of this server its a power house but this server consumes massive amounts of power using its two 575W power supplies.
Since the Raspberry Pi 2 model b was released I have been very interested on getting my hands on one. After receiving an excessive power bill I took the plunge and ordered my first Pi 2
With a 900 MHz quad core CPU and 1 GB RAM they pack some grunt in a small form-factor. The power saving is massive with a 2A micro USB charger using a mere 10W. Even if you used 2 or 3 Pi’s to run your website the power saving is huge.
Have a look at my awesome test bench. Still unsure of the type of case I want yet.
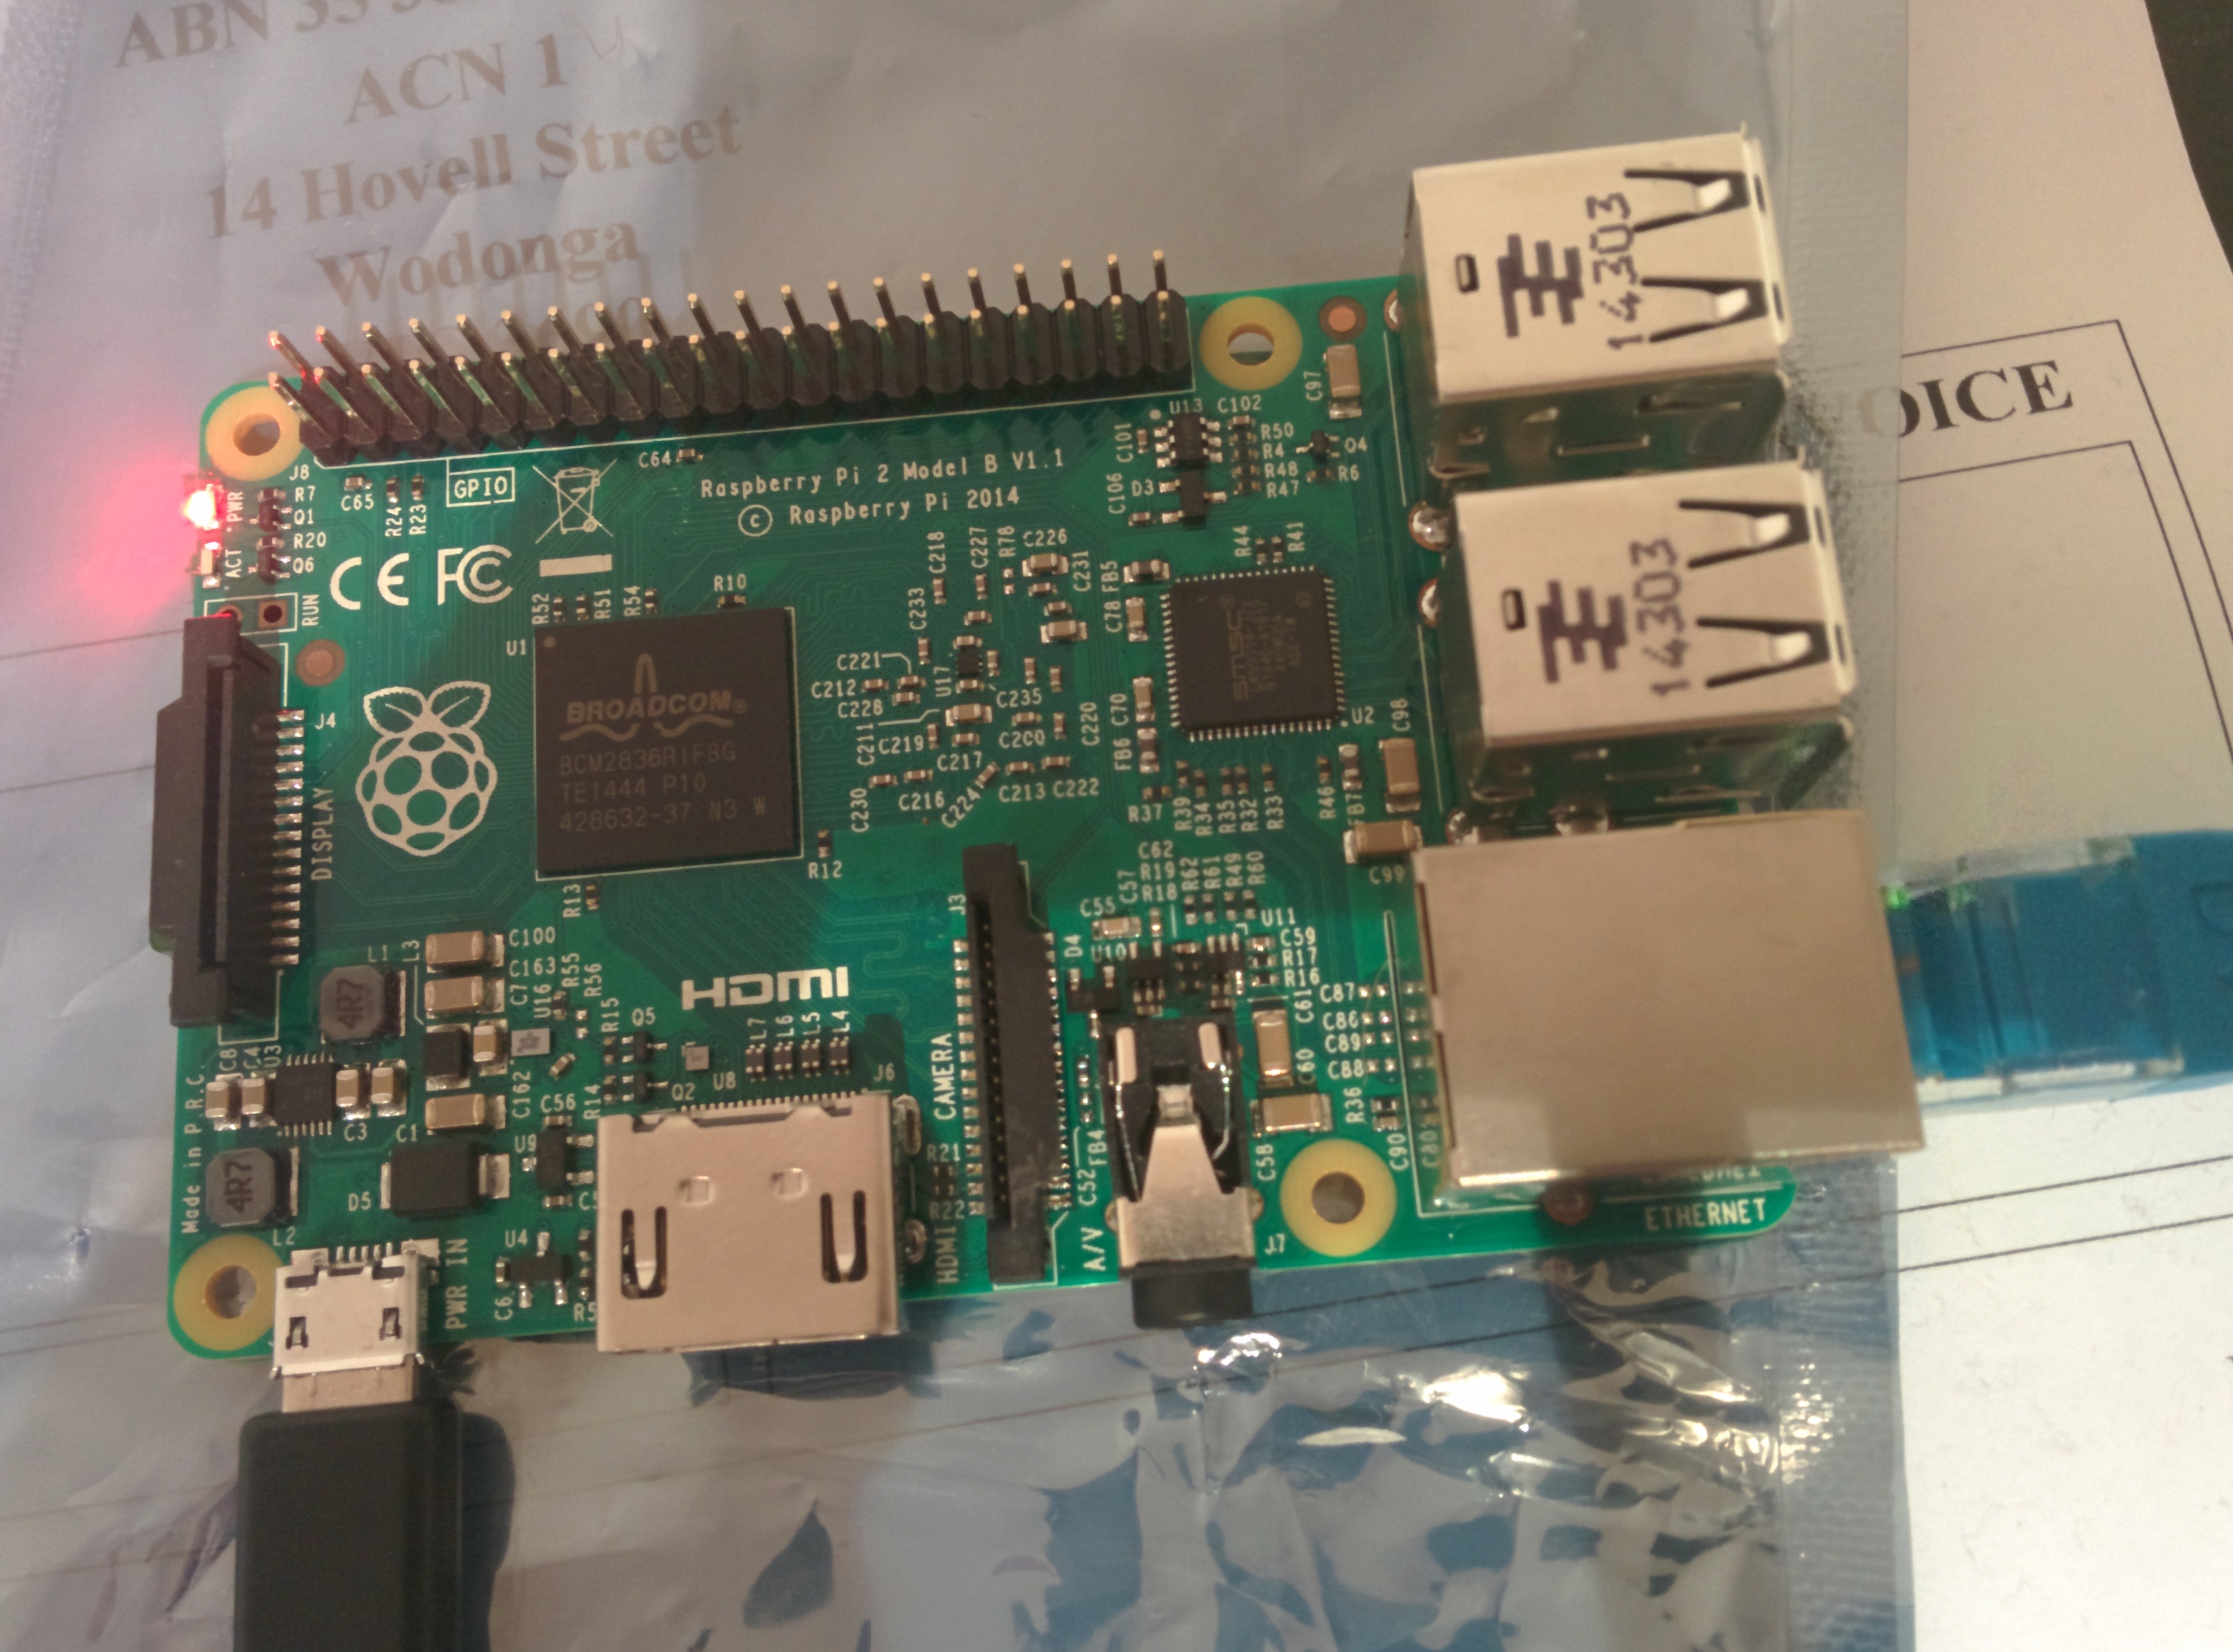
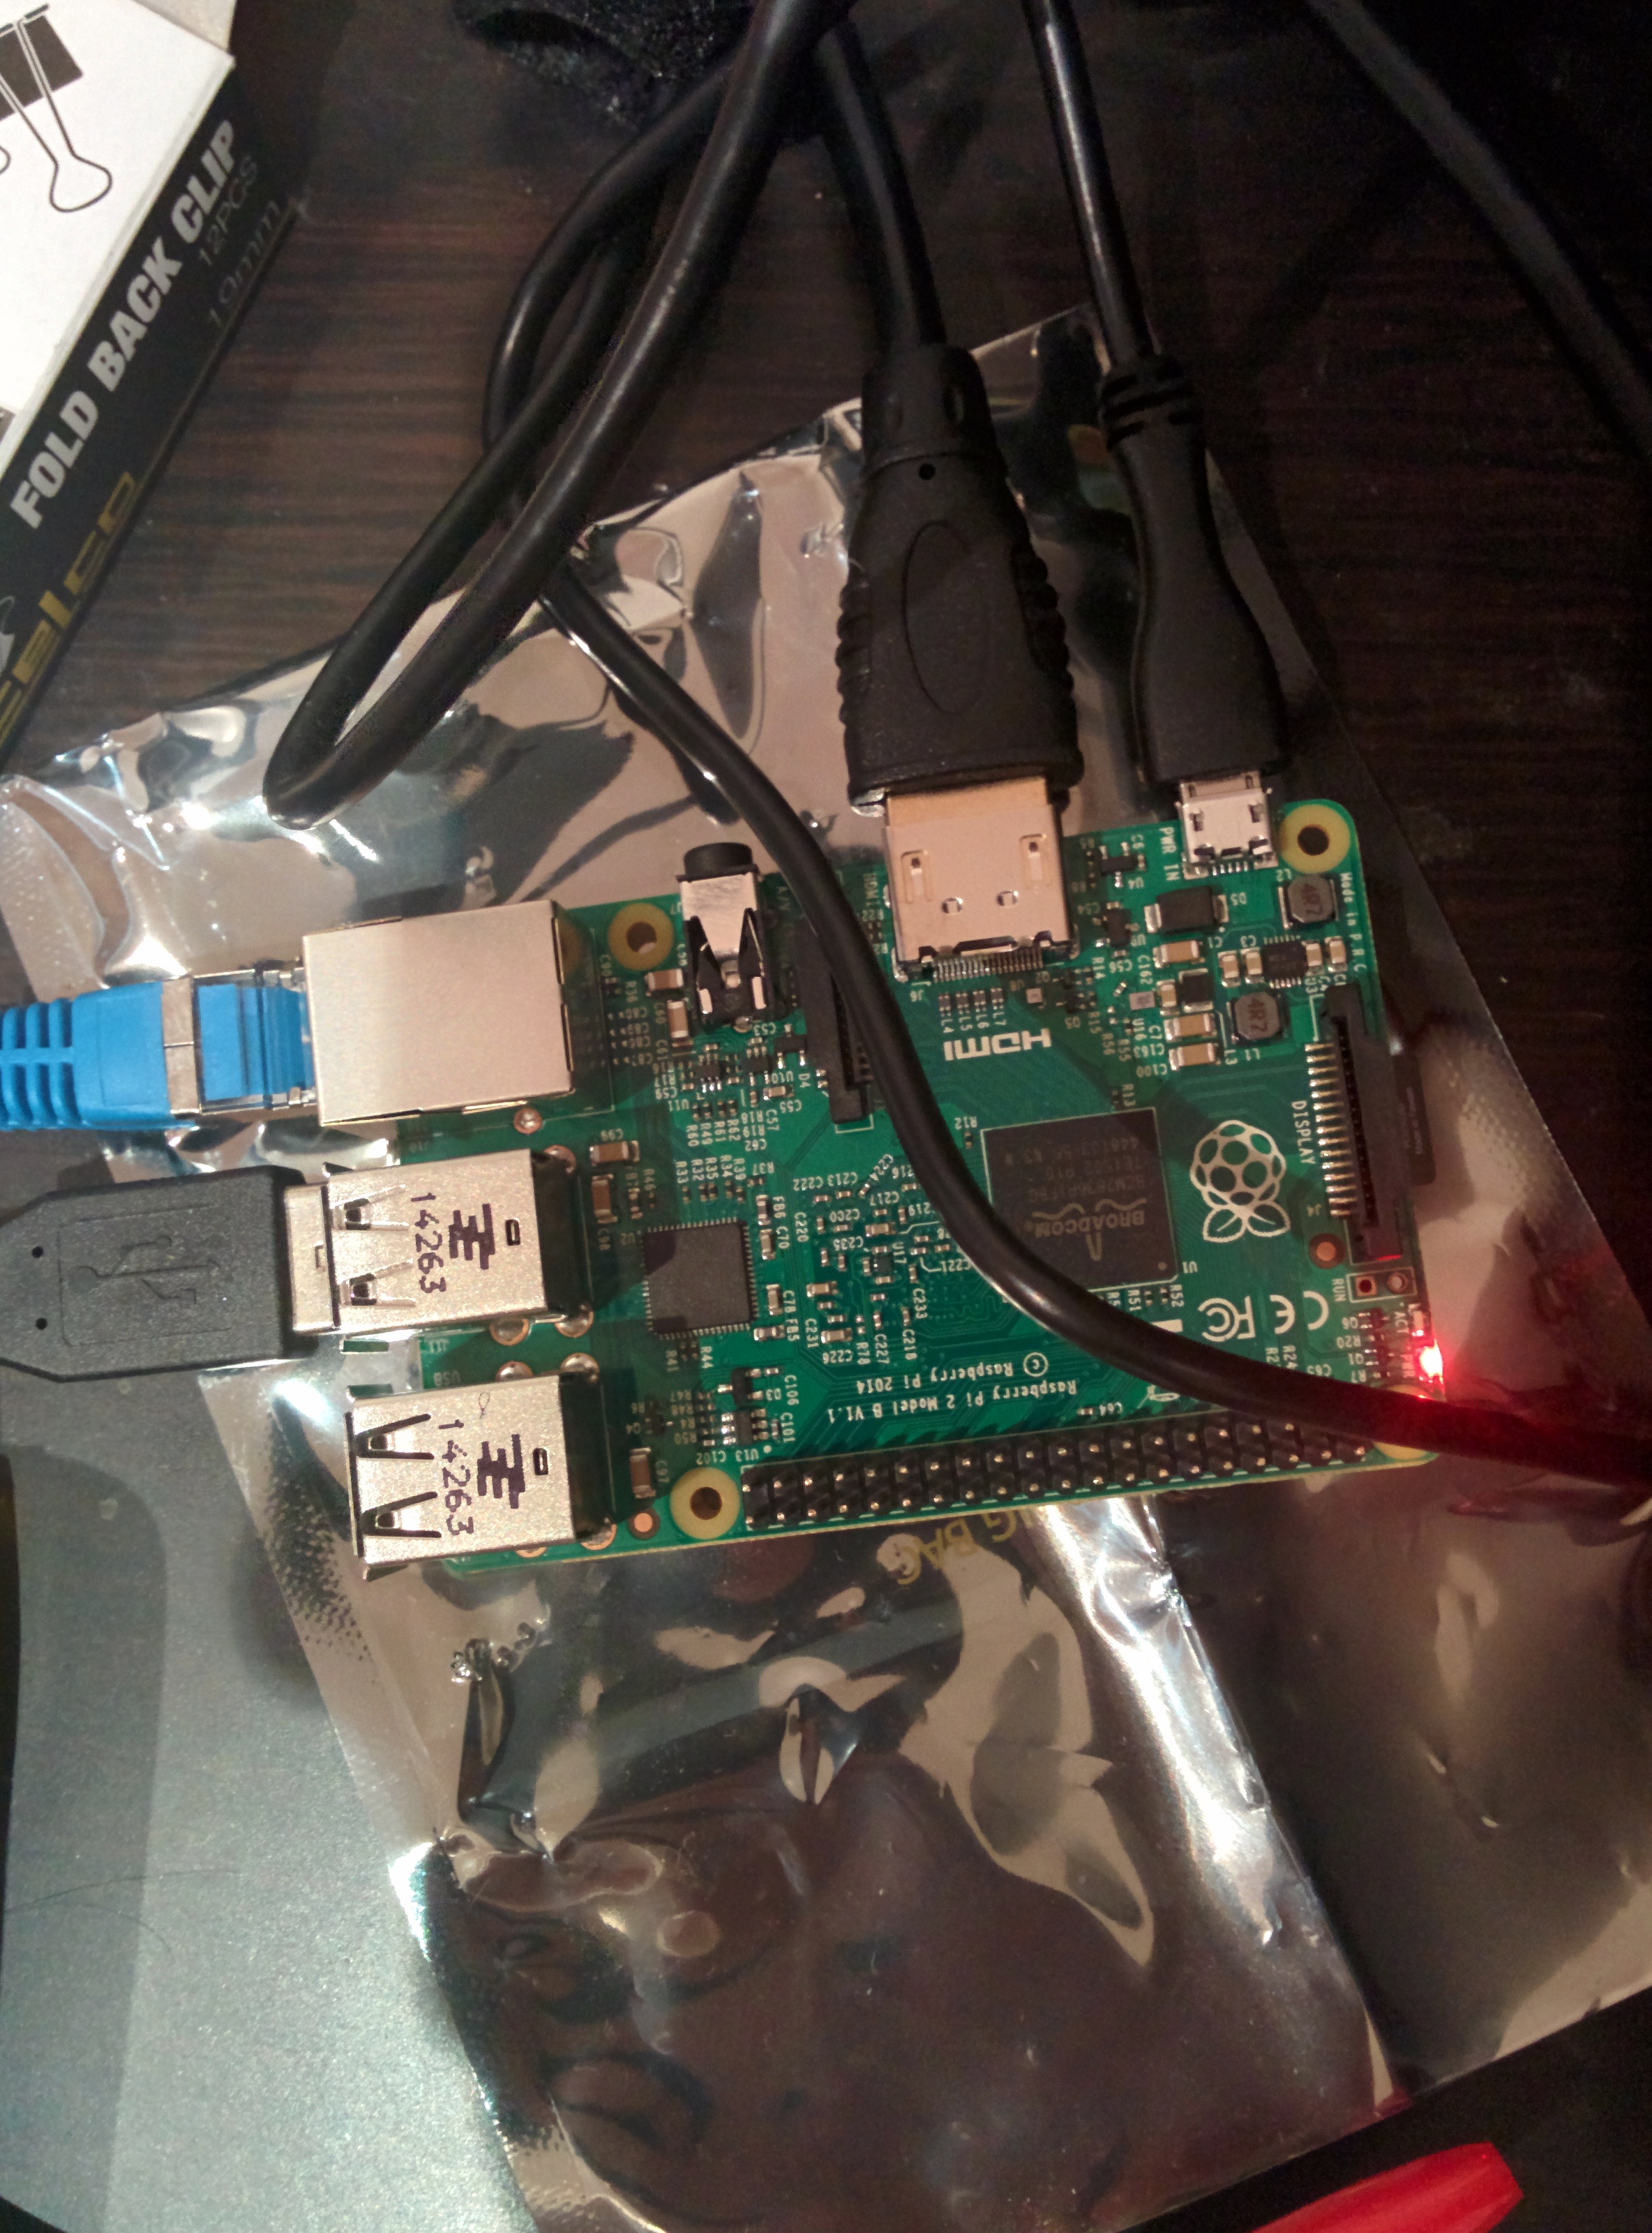
Currently I have one configured as a web server running Apache2/PHP5/APC and another running MySQL server. Not sure if a single web server will be enough grunt but time will tell. After performing some load tests I’m impressed on how well the Pi holds up.
If load becomes a real issue I’ll run a Pi with Varnish. I’ve used Varnish reverse web proxy in the past and its awesome at reducing web server load.
When I get my hands on some more Pi’s I’ll perform some bench marks comparing Apache2 and Nginx.
I’m sure you will see many more Pi related posts to come..
Migrate my desktop from Ubuntu to Fedora
Over the past 11 years I have used a few Linux distributions on my desktop. Here is an overview:
2002: RedHat 7/8 was used no a spare desktop
2005: 5.04 Hoary Hedgehog was installed on my main desktop
2005: 5.10 Breezy Badger was installed on my server.
2006: 6.06 Dapper Drake came out which was the first LTS (long term support). From then on all my servers ran the latest LTS build.
2011: 11.04 Natty Narwhal brought Unity replacing Gnome 2.x. While I was never a fan on unity I continued to use Ubuntu.
Everything was great up until when I upgraded from a stable 13.04 Raring Ringtail April 2013 to 13.10 Saucy Salamander September 2013. 13.10 which was very buggy. With high memory/cpu usage and poor video playback I started thinking that Ubuntu is no longer cutting it.
On the weekend I installed CentOS 6.4 on one of my servers for testing and it had me thinking, If RedHat Enterprise/CentOS use Gnome 2.x on their desktop builds perhaps Fedora using Gnome 3. I had a quick look on their website and Fedora 19 confirmed me thinking. I downloaded a copy and got straight to the migration.
The installation went without a hitch and when I sore Gnome 3 it was love at first sight. I have installed Google Chrome and Rythembox, both applications used to crash all the time under Ubuntu 13.10 but they no longer crash. Yum is alittle different then apt-get and takes some getting used to but its not as quick as apt-get. Memory and cpu usage lower since the switch.
If you are thinking that Ubuntu 13.10 is a slow peace of shit that crashes all the time, perhaps give Fedora live a try.
Publish Moodle behind MS TMG
The plan was to set up Moodle internally and have it published by TMG. This would allow the speed of HTTP internally and the security of HTTPS externally. Moodle URL is by the config.php file in either a http or https modes but not both which holds Moodle back. I turned to TMG and found the link translation option can solve my problem.
Web server set up
Apache2 web service
<Directory /var/www/moodle/auth/ldap/>
<Files ntlmsso_magic.php>
NTLMAuth on
AuthType NTLM
AuthName “Moodle NTLM Authentication”
NTLMAuthHelper “/usr/bin/ntlm_auth –helper-protocol=squid-2.5-ntlmssp”
NTLMBasicAuthoritative on
require valid-user
Order allow,deny
Allow from all
</Files>
</Directory>
TMG server set up
Web Publishing Rule for external https
- Authentication delegation: NTML
- Published server logout url: /login/logout.php
- Bridging: redirect requests to port 80.
- Users: All authenticate users.
- Link Translation MUST be enabled with configure
- replace ‘path=/; HttpOnly’ with ‘path=/; secure; HttpOnly’. This makes the Moodle cookie only work in https.
- replace ‘http:\/\/yourdomainname.org’ with ‘https:\/\/yourdomainname.org’. This fixes in page javascript.
- Create an SSL listener
- html form with Active Directory Authentication Validation
- Authentication Preferences have Validate credentials for every http request enabled.
- Connections only enable 443 ssl
- Select ssl certificate.
- SSO set domain.
- Networks, set external IP.
Web Publishing Rule for external http
- Authentication delegation: None
- Bridging: redirect requests to port 80.
- Users: All users.
- Create a web listener on port 80 with no authentication.
Web Publishing Rule for external http login
Copy the http rule and name it http login. This rule allows login redirect from http to https.
- Link transactions, custom, Path delete ‘/’ and replace it with ‘/login/*’ and ‘/auth/*’
- Action, Deny, Redirect to ‘https://yourdomainname.org/login/index.php’
The deny rule must be above the allow http in the TMG firewall policy list or it wont work.
Finished product
Guest access via http
Login form

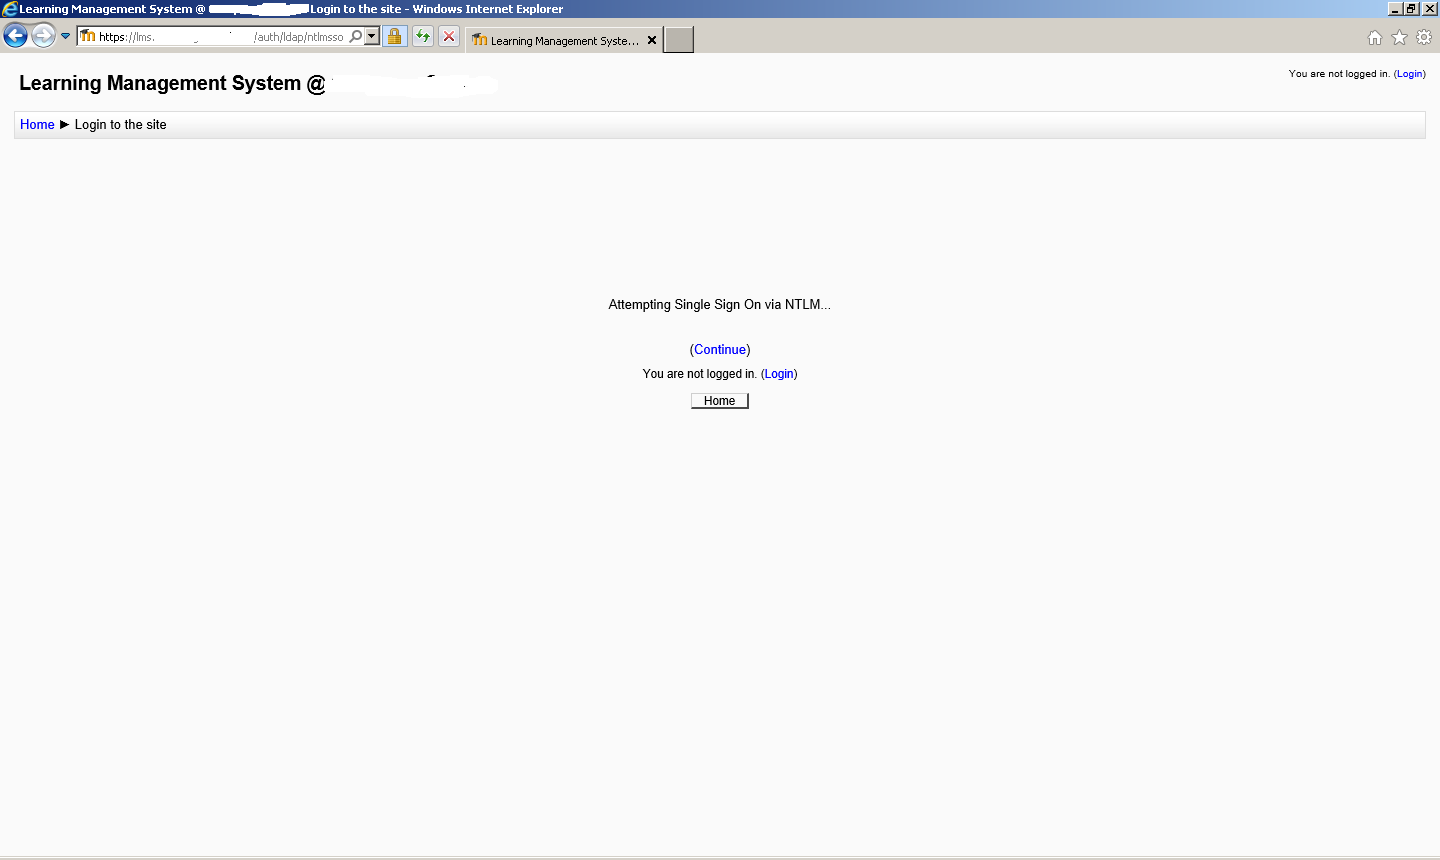
NTLM SSO
Secure access
Logout
Web Server Upgrade
Its been 1 year since I began using a HP ProLiant DL360 G3 as my web server to host this web site. The last server upgrade was talked about in this post. During that time I have had two fan kit fail which caused a around a week of down time. I knew it was time to decommission the aging server. The HP ProLiant DL360 G3 server had caused me issues long before it started to fail such as it doesn’t support a 64 bit operating system, limited ram slots, only supports two hard disks and the lack of processing power meant that a reverse proxy (Varnish) was a must.
My replacement server is a HP ProLiant DL380 G4. The specs for this server are as:
- 64 bit support
- 6 GB of RAM
- Two Intel Xeon CPUs clocked at 3.60GHz with hyperthreading
- Two 72 GB SCSI 15,000 RPM hard disks in a RAID 1 for the root file system
- Four 146 GB SCSI 15,000 RPM hard disks in a RAID 10 for the www and mysql data
Just like the old server I am running Ubuntu Linux 12.04 LTS as my operating system but this time I can install the 64 bit version. Due to the upgrade in performance I have chosen to not install varnish or any reverse proxy but simply use PHP caching. I went with APC (Alternative PHP Cache) as is maintained by PHP. I have done some basic performance testing and found that my router is more likely to freeze due to high load than my web server.
Remove Symantec Endpoint Protection with CleanWipe
Within Department of Education and Early Childhood Development (DEECD) schools also known as Victorian Government schools we run Symantec Endpoint Protection (SEP) for our Anti-Virus program.
Our schools were recently informed to upgrade SEP 12.1 RU1 from SEP 11. I installed the upgrade onto one of my Windows 2008 R2 servers at work and found a bug which enables all network interfaces, including disabled ones at boot. This was rather annoying as some of my servers have up to 4 network interfaces of which not all are used and need to remain disabled. For more information on the bug visit the Symantec website http://www.symantec.com/business/support/index?page=content&id=TECH185646.
I was informed by a technician at DEECD that the bug was resolved in SEP 12.1 RU1 MP1. The 32bit version of the patch applied without issue but when I applied the 64bit patch I ran into mayor issues after reboot. I seemed that the patch failed to apply and now windows has SEP listed in the installed programs list twice. I was unable to remove either version of SEP.
I contacted Symantec and created a case where I requested CleanWipe. Less than 24 hours later I was contact by Symantec and provided with a username and password to download cleanwipe from https://fileshare.symantec.com.
You can download version 12.1.2015.2015 of CleanWipe from my web site if you wish, click HERE or HERE (Google Drive) to start Download. The password for the zip is symantec.
Filter YouTube with YouTube For Schools and squidGuard

Before we start
Your LAN must already run a production instance of squid running on a Linux operating system such as Ubuntu.
For this guide, I was using Ubuntu Server 12.04 LTS which ships with squid/3.1.19. The guide has been tested on both 32 & 64 bit builds.
Ensure the following top-level domains are not blocked
youtube.com
ytimg.com
Sign up for a YouTube for school account
Go to http://www.youtube.com/account_school and sign up for a YouTube For school Account. The sign up process should only take minutes.
Once you account is created go to http://www.youtube.com/account_school and under the Instrucations heading, Step 1, search for the following string X-YouTube-Edu-Filter: the random numbers and letters after that string are your account ID. The account ID is required for the redirection to work correctly. Please document your account ID.
ABCD1234567890abcdef
Install squidGuard
squidGuard is the URL rewrite program. To install use the following command
proxy:~$ sudo apt-get install squidguard
Edit squidGuard configuration
Lets backup the default squidGuard configuration as it has examples which as useful but none of which we require.proxy:~$ sudo cp -v /etc/squid/squidGuard.conf /etc/squid/squidGuard.conf.original
So time to edit the squidGuard configuration and make it work for you.
proxy:~$ sudo vim /etc/squid/squidGuard.conf
Remove all the examples and paste in the new configuration from below. Please replace ABCD1234567890abcdef with your YouTube for Schools Account ID. Save and exit
#
# CONFIG FILE FOR SQUIDGUARD
#
# Caution: do NOT use comments inside { }
#
dbhome /var/lib/squidguard/db
logdir /var/log/squid
# ACL RULES:
#
rew youtube {
 s@(http://www.youtube.com/watch\?v=.*)@\1\&edufilter=ABCD1234567890abcdef@i
}
acl {
 default {
 pass any
 rewrite youtube
 }
}
Add squidGuard into your squid configuration
proxy:~$ sudo vim /etc/squid3/squid.conf
Search for url_rewrite_program and insert the following line. Save and exit.
url_rewrite_program /usr/bin/squidGuard -c /etc/squid/squidGuard.conf
Restart squid to enable squidGuard
To enable the config changes to the squid service.
proxy:~$ sudo service squid3 restart
YouTube for schools in now enabled
When you load http://www.youtube.com you be able to see all videos listed on the main page but when you attempt to watch these videos you will only be able to view content classified as educational by youtube or content that the has been added to the schools youtube account’s playlists.

While you can add staff into a list of teachers that can view all content, only the administrator (schools youtube account) can add content to be viewed by all students.
You may want to block access to youtube.com via HTTPS as squidGuard rewrite is unable to intercept SSL connections.
References
http://www.youtube.com/account_school
http://support.google.com/youtube/bin/static.py?hl=en&page=guide.cs&guide=2592683&topic=2592688
Configure HP Procurve Switch via Command Line Interface
After getting my eyes of a Cisco 2960 configured created by DEECD, I decided to replicate their config on our HP Procurve switches.
Connect to the switch via telnet or the serial console and enter config mode
switch# config
Set IP address gateway
ip default-gateway 10.136.236.1
Set hostname and contact details
switch(config)# hostname "2510_01"
2510_01(config)# snmp-server contact "tyrone.wyatt@gmail.com"
2510_01(config)# snmp-server location "Senior Campus, Server Room"
Set timezone and network time protocol details
2510_01(config)# timesync sntp
2510_01(config)# sntp server 10.10.20.69
2510_01(config)# sntp unicast
Set timezone offset from GMT in minutes
2510_01(config)# time timezone 600
Enable web management SSL and disable web management plaintext
2510_01(config)# crypto key generate cert 1024
2510_01(config)# crypto host-cert generate self-signed
Validity start date [10/21/2012]: 10/21/2012
Validity end date [10/21/2013]: 10/21/2018
Common name [0.0.0.0]: 10.136.236.68
Organizational unit [Dept Name]: ICT
Organization [Company Name]: XXXX College
City or location [City]: XXXX
State name [State]: VIC
Country code [US]: AU
2510_01(config)# web-management ssl
2510_01(config)# no web-management plaintext
Enable SSH and disable telnet
2510_01(config)# crypto key generate ssh
Installing new RSA key. If the key/entropy cache is depleted, this could take up to a minute.
Enable SSH version 2 if supported
2510_01(config)# ip ssh version 2
Enable SSH version 1 if version 2 isn’t supported
2510_01(config)# ip ssh
2510_01(config)# no telnet-server
Set username and passwords
2510_01(config)# password manager user-name admin
2510_01(config)# password operator user-name monitor
Set banner
2510_01(config)# banner motd %
#######################################################################
# Authorised Users Only #
# The information on this computer and network is the property of #
# <COMPANY NAME> and is protected by intellectual property #
# rights. You must be assigned an account on this computer to #
# access the information and are only allowed to access information as #
# defined by the System Administrator(s). Your activities are #
# monitored for security reasons. #
########################################################################
%
Set name for interface/s
interface B1-B6 name " "
Save and view the configuration
2510_01(config)# write memory
2510_01(config)# show run
References
http://h20000.www2.hp.com/bc/docs/support/SupportManual/c01868095/c01868095.pdf
http://www.rienbroekstra.nl/?q=node/18
http://linuxman.wikispaces.com/HP+ProCurve+E-series+setup